

Shi Qing Poh
Author
2 November 2026
9 min read
How to Move an Aquarium in Singapore: A Step-by-Step Guide for Relocation Day
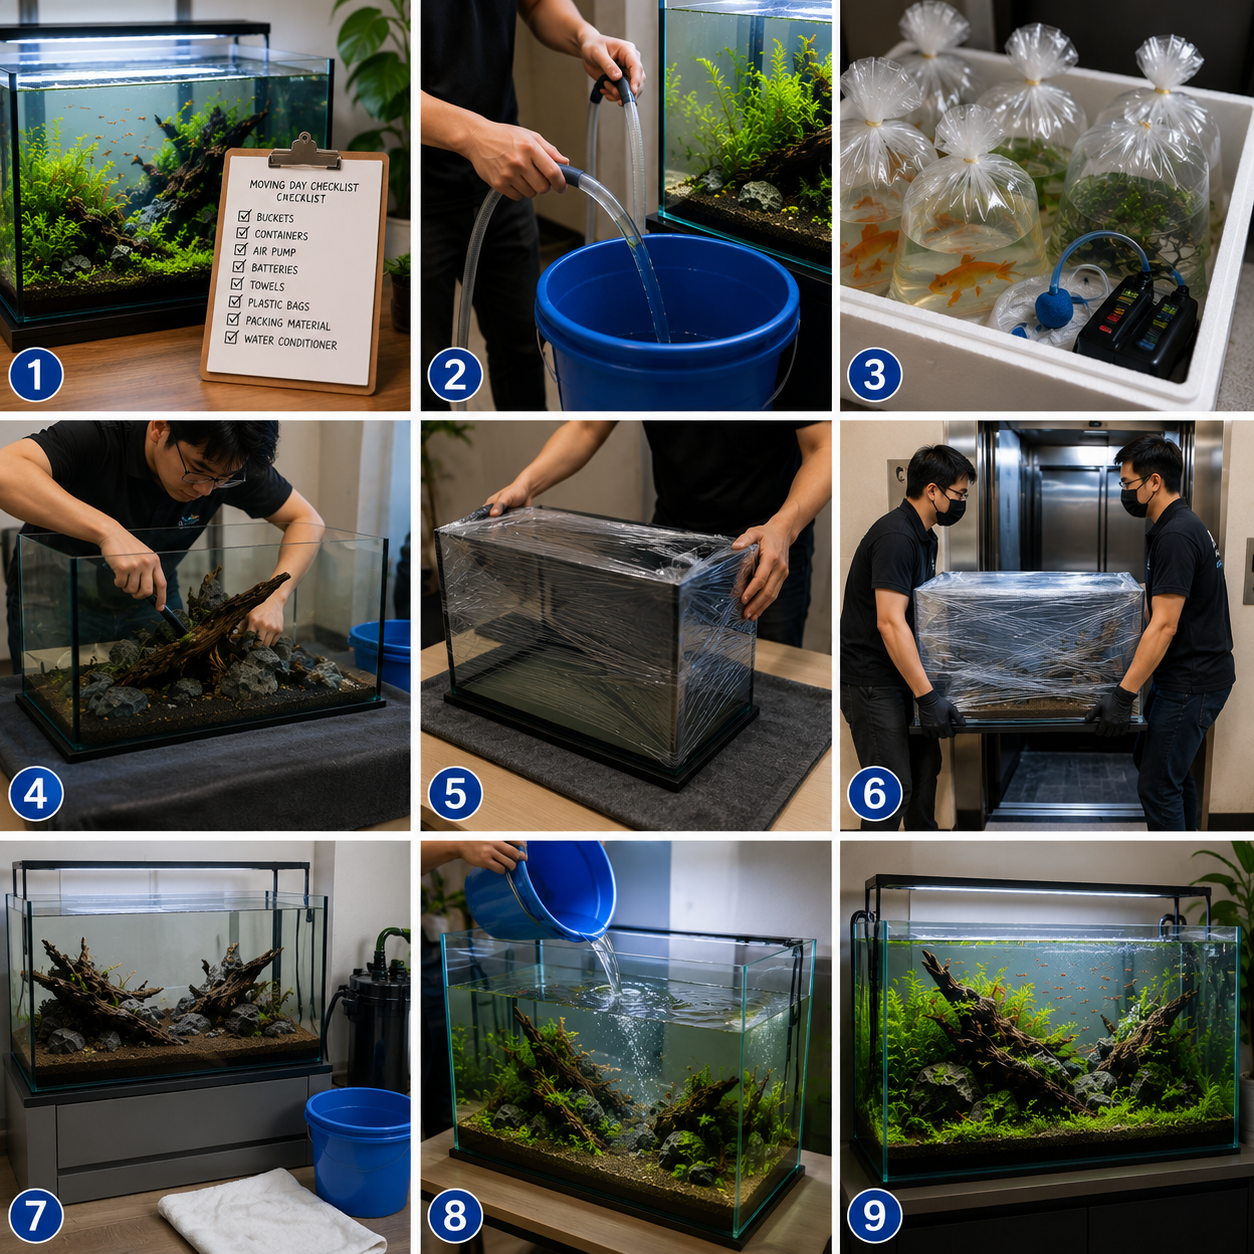
Moving house is stressful enough — moving an aquarium adds a significant layer of complexity. The fish, water, substrate, and live bacteria in your filter all need to arrive at the new location in a condition that allows the tank to be running and stable within hours. This guide covers the complete process for moving a freshwater aquarium in Singapore.
Planning: Before Moving Day
1. Timing
- Schedule the aquarium as the last thing to dismantle and first thing to set up at the new location
- Total time from tank breakdown to fish back in running water should be under 4–6 hours ideally. Beyond 8 hours, beneficial bacteria in the filter begin dying significantly.
2. What You Need
- Multiple clean buckets with lids (food-grade, not previously used for cleaning chemicals)
- Clean large bags with oxygen top-off capability, or battery-powered air pump for buckets
- Styrofoam fish bags or large ziplock bags for fish transport
- Net
- Siphon hose
- Waterproof labels and marker
- Clean towels
- Mover's blanket for padding equipment
Step-by-Step: Moving Day
Step 1: Collect Tank Water Into Buckets
Fill 70–80% of your buckets with existing tank water. This water:
- Will be used to house fish during transport
- Will refill the tank immediately on arrival (maintaining water chemistry continuity)
- Preserves beneficial bacteria in the water
Step 2: Transfer Fish
- Net fish gently into buckets filled with tank water
- Do not overcrowd — 1 cm of fish per litre of water as a rough maximum
- Run a battery-powered air pump into each bucket during transport
- Cover buckets with lids to reduce stress from external stimuli
- In Singapore's heat: keep buckets in air-conditioned vehicles; temperature changes above 3–4°C cause stress
Step 3: Preserve the Filter
This is the most critical step.
- Remove the filter from the tank with its media intact
- Store filter sponges and ceramic media submerged in the saved tank water, in a sealed bucket
- Do not rinse or expose filter media to air any longer than necessary
- If the journey exceeds 2 hours, add a small air stone to the filter media bucket
- Never let filter media dry out — beneficial bacteria die within minutes of desiccation
Step 4: Remove Plants
- Stem plants: bundle loosely and keep damp in a bucket of tank water
- Epiphytes (java fern, anubias): wrap in wet newspaper or keep submerged in a small container
- Mosses: keep in a sealed bag with a splash of tank water
- Plants can survive 12–24 hours this way without issue
Step 5: Remove Substrate (If Moving)
- Scoop substrate into buckets or bags — it does not need to stay wet but should be kept moist to preserve bacteria
- For aquasoil that has been active for less than 6 months, preserving it is worthwhile — it retains active bacterial populations
- For old substrate (2+ years), replacing it at the new location may be sensible
Step 6: Remove Hardscape and Equipment
- Remove rocks and driftwood; wrap fragile glass lily pipes separately
- Wrap the empty tank in a mover's blanket for transport — never leave it unwrapped in a moving vehicle
- Transport tanks upright — never on their side or upside down
At the New Location
Step 1: Set Up the Stand
- Position the stand first and confirm it is level (use a spirit level)
- Place a foam mat between stand and tank if your stand does not have padding
Step 2: Add Tank and Substrate
- Place tank on stand; add substrate; add hardscape
Step 3: Add Saved Tank Water First
- Pour all saved tank water into the tank before adding any new tap water
- This re-establishes the bacterial environment immediately
- Top up with dechlorinated tap water to the desired level
Step 4: Restart Filter Immediately
- Install the filter with preserved media and start it running before adding fish
- The bacterial colony needs water flow to recover — even 15–20 minutes of running is beneficial
Step 5: Return Fish
- Float the fish bucket or bag in the tank for 10–15 minutes to equalise temperature
- Transfer fish with a net; do not add bucket water to the tank
Step 6: Monitor Closely
The 48 hours after a move are the highest risk period:
- Test ammonia and nitrite daily for the first week
- Perform a 25% water change if ammonia exceeds 0.25 ppm
- Feed sparingly for the first 2–3 days
- Expect some fish to be temporarily stressed — provide cover and reduce lighting intensity for 24 hours
Browse our water care, test kits, and aquarium accessories for everything you need for a smooth aquarium move in Singapore.